Наблюдательный do php action. PHP и формы. ООП, классы, объекты и анонимные функции
4 years ago
Do-while loops can also be used inside other loops, for example:
This version is easier to read and understand. And arguments for code golf are invalid as well as this version is 3 lines shorter.
In conclusion, although you can certainly write code that abuses the `break` keyword, you shouldn"t in practice. Keep the code easy to read and understand for whoever inherits your code. And remember, code is for humans not computers.
10 years ago
I"m guilty of writing constructs without curly braces sometimes... writing the do--while seemed a bit odd without the curly braces ({ and }), but just so everyone is aware of how this is written with a do--while...
a normal while:
a do--while:
Also, a practical example of when to use a do--while when a simple while just won"t do (lol)... copying multiple 2nd level nodes from one document to another using the DOM XML extension
24.6K
Ни для кого не является секретом, что наиболее распространенным способом взаимодействия html-страницы с сайтом является форма. Форма (то есть, html-элемент образуемый тегом form) используется и бесплатными почтовыми службами, электронными магазинами и многими другими типами сайтов.
Обработка простых форм посредством PHP не представляет никакого труда. Однако время от времени возникает потребность обработать форму, содержащую несколько однотипных полей, притом, что их количество может изменяться в широком диапазоне и их количество заранее не известно. В PHP предусмотрено для таких случаев обработка однотипных полей как массива значений.
Рассмотрим подробнее варианты для разных типов полей. Текстовые поля
Под текстовыми полями в этой статье понимаются элементы, создаваемые тегам input со значением параметра type равным text и тегом textarea . Организовать обработку формы состоящей из нескольких таких полей проще всего. На листинге ниже приведен листинг с html-разметкой для такой формы.
Как видно из листинга, имена для элементов формы, с точки зрения PHP , являются элементами массива. Поэтому PHP -сценарий, который будет обрабатывать эту форму, будет воспринимать все множество текстовых полей этой формы как единый массив. К отдельным элементам можно обращаться по индексам или использовать перечисление при помощи команд list и each , как это сделано в следующем примере.
ПереключателиПереключателями (checkbox ) в этой статье называются элементы, создаваемые тегам input со значением параметра type равным checkbox . Форма для использования переменного количества «переключателей » строится абсолютно так же. Обратите внимание, что выбор конкретного значения переключателя (то есть значение свойства value) не важен. Пример приведен в листинге ниже:
Однако обработка такой формы отличается от обработки, описанной для текстовых полей. В данном случае необходимо определить, включил или нет посетитель сайта тот или иной переключатель. Если включил — то соответствующий элемент массива существует, если нет — то отсутствует. В следующем листинге приведен пример PHP сценария, который распечатывает включенные переключатели:
Радио-кнопкиПеред тем как описывать обработку радио-кнопок необходимо вспомнить, как они работают. Суть радио-кнопок (элементы созданные тегами input со значением параметра type равным radio ) заключается в том что, выбирая одну кнопку, пользователь автоматически снимает выделение с другой кнопки из этого же набора. Кнопки объединяются в набор очень просто: у всех кнопок в наборе одно и тоже имя.
А вот значения (то есть параметры value ) у кнопок в наборе — разные. И на сайт будет отправлено значение выбранной кнопки с именем набора. Так же как и в случае с текстовыми полями и переключателями имена наборов радио-кнопок должны оформляться как имена элементов массива в PHP. Пример такой формы приведен в следующем листинге:
// первый набор кнопок
// второй набор кнопок
// третий набор кнопок
Обработка радио-кнопок объединяет идеи, использование при обработке, как текстовых полей, так и переключателей. Если автор html-страницы не установил значение по умолчанию, а пользователь не выбрал определенную кнопку в наборе радио-кнопок, то данный элемент будет отсутствовать в массиве (как для переключателей).
Одно из главнейших достоинств PHP - то, как он работает с формами HTML. Здесь основным является то, что каждый элемент формы автоматически становится доступным вашим программам на PHP. Для подробной информации об использовании форм в PHP читайте раздел . Вот пример формы HTML:
Пример #1 Простейшая форма HTML
Ваше имя:
Ваш возраст:
В этой форме нет ничего особенного. Это обычная форма HTML без каких-либо специальных тегов. Когда пользователь заполнит форму и нажмет кнопку отправки, будет вызвана страница action.php . В этом файле может быть что-то вроде:
Пример #2 Выводим данные формы
Здравствуйте,
.
Вам
лет.
Пример вывода данной программы:
Здравствуйте, Сергей. Вам 30 лет.
Если не принимать во внимание куски кода с htmlspecialchars() и (int) , принцип работы данного кода должен быть прост и понятен. htmlspecialchars() обеспечивает правильную кодировку "особых" HTML-символов так, чтобы вредоносный HTML или Javascript не был вставлен на вашу страницу. Поле age, о котором нам известно, что оно должно быть число, мы можем просто преобразовать в integer , что автоматически избавит нас от нежелательных символов. PHP также может сделать это автоматически с помощью расширения filter . Переменные $_POST["name"] и $_POST["age"] автоматически установлены для вас средствами PHP. Ранее мы использовали суперглобальную переменную $_SERVER , здесь же мы точно так же используем суперглобальную переменную $_POST , которая содержит все POST-данные. Заметим, что метод отправки (method) нашей формы - POST. Если бы мы использовали метод GET , то информация нашей формы была бы в суперглобальной переменной $_GET . Кроме этого, можно использовать переменную $_REQUEST , если источник данных не имеет значения. Эта переменная содержит смесь данных GET, POST, COOKIE.
15 years ago
According to the HTTP specification, you should use the POST method when you"re using the form to change the state of something on the server end. For example, if a page has a form to allow users to add their own comments, like this page here, the form should use POST. If you click "Reload" or "Refresh" on a page that you reached through a POST, it"s almost always an error -- you shouldn"t be posting the same comment twice -- which is why these pages aren"t bookmarked or cached.
You should use the GET method when your form is, well, getting something off the server and not actually changing anything. For example, the form for a search engine should use GET, since searching a Web site should not be changing anything that the client might care about, and bookmarking or caching the results of a search-engine query is just as useful as bookmarking or caching a static HTML page.
2 years ago
Worth clarifying:
POST is not more secure than GET.
The reasons for choosing GET vs POST involve various factors such as intent of the request (are you "submitting" information?), the size of the request (there are limits to how long a URL can be, and GET parameters are sent in the URL), and how easily you want the Action to be shareable -- Example, Google Searches are GET because it makes it easy to copy and share the search query with someone else simply by sharing the URL.
Security is only a consideration here due to the fact that a GET is easier to share than a POST. Example: you don"t want a password to be sent by GET, because the user might share the resulting URL and inadvertently expose their password.
However, a GET and a POST are equally easy to intercept by a well-placed malicious person if you don"t deploy TLS/SSL to protect the network connection itself.
All Forms sent over HTTP (usually port 80) are insecure, and today (2017), there aren"t many good reasons for a public website to not be using HTTPS (which is basically HTTP + Transport Layer Security).
As a bonus, if you use TLS you minimise the risk of your users getting code (ADs) injected into your traffic that wasn"t put there by you.
Последнее обновление: 1.11.2015
Одним из основных способов передачи данных веб-сайту является обработка форм. Формы представляют специальные элементы разметки HTML, которые содержат в себе различные элементы ввода - текстовые поля, кнопки и т.д. И с помощью данных форм мы можем ввести некоторые данные и отправить их на сервер. А сервер уже обрабатывает эти данные.
Создание форм состоит из следующих аспектов:
Создание элемента в разметке HTML
Добавление в этот элемент одно или несколько поле ввода
Установка метода передачи данных: GET или POST
Установка адреса, на который будут отправляться введенные данные
Итак, создадим новую форму. Для этого определим новый файл form.php , в которое поместим следующее содержимое:
Вход на сайт
Логин:
Пароль:
Атрибут action="login.php" элемента form указывает, что данные формы будет обрабатывать скрипт login.php , который будет находиться с файлом form.php в одной папке. А атрибут method="POST" указывает, что в качестве метода передачи данных будет применяться метод POST.
Теперь создадим файл login.php , который будет иметь следующее содержание:
Чтобы получить данные формы, используется глобальная переменная $_POST . Она представляет ассоциативный массив данных, переданных с помощью метода POST. Используя ключи, мы можем получить отправленные значения. Ключами в этом массиве являются значения атрибутов name у полей ввода формы.
Так как атрибут name поля ввода логина имеет значение login (), то в массиве $_POST значение этого поля будет представлять ключ "login": $_POST["login"]
И поскольку возможны ситуации, когда поле ввода будет не установлено, например, при прямом переходе к скрипту: http://localhost:8080/login.php . В этом случае желательно перед обработкой данных проверять их наличие с помощью функции isset() . И если переменная установлена, то функция isset() возвратит значение true .
Теперь мы можем обратиться к форме:
И по нажатию кнопки введенные данные методом POST будут отправлены скрипту login.php :
Необязательно отправлять данные формы другому скрипту, можно данные формы обработать в том же файле формы. Для этого изменим файл form.php следующим образом:
Вход на сайт
Логин:
Пароль:
Большое значение в PHP имеет организация безопасности данных. Рассмотрим несколько простых механизмов, которые могут повысить безопасность нашего веб-сайта.
Но вначале возьмем форму из прошлой темы и попробуем ввести в нее некоторые данные. Например, введем в поле для логина "alert(hi);", а в поле для пароля текст "пароль":
После отправки данных в html разметку будет внедрен код javascript, который выводит окно с сообщением.
Чтобы избежать подобных проблем с безопасностью, следует применять функцию htmlentities() :
If(isset($_POST["login"]) && isset($_POST["password"])){
$login=htmlentities($_POST["login"]);
$password = htmlentities($_POST["password"]);
echo "Ваш логин: $login
Ваш пароль: $password";
}
И даже после ввода кода html или javascript все теги будут экранированы, и мы получим следующий вывод:
Еще одна функция - функция strip_tags() позволяет полностью исключить теги html:
If(isset($_POST["login"]) && isset($_POST["password"])){
$login=strip_tags($_POST["login"]);
$password = strip_tags($_POST["password"]);
echo "Ваш логин: $login
Ваш пароль: $password";
}
Результатом ее работы при том же вводе будет следующий вывод.
RxGroovy has several Do variants.
- Javadoc:
- Javadoc:

- Javadoc:
The doOnRequest operator (new in RxGroovy 1.1) registers an Action which will be called whenever an observer requests additional items from the resulting Observable. That Action receives as its parameter the number of items that the observer is requesting.
- Javadoc:
- Javadoc:

- Javadoc:

- Javadoc:
- Javadoc:

before
- Javadoc:
after the resulting Observable terminates, whether normally or with an error.
Sample Codedef numbers = Observable.from(); numbers.finallyDo({ println("Finally"); }).subscribe({ println(it); }, // onNext { println("Error: " + it.getMessage()); }, // onError { println("Sequence complete"); } // onCompleted);
1 2 3 4 5 Sequence complete Finally
- Javadoc:
RxJava has several Do variants.
The doOnEach operator allows you to establish a callback that the resulting Observable will call each time it emits an item. You can pass this callback either in the form of an Action that takes an onNext variety of Notification as its sole parameter, or you can pass in an Observer whose onNext method will be called as if it had subscribed to the Observable.
- Javadoc:
- Javadoc:
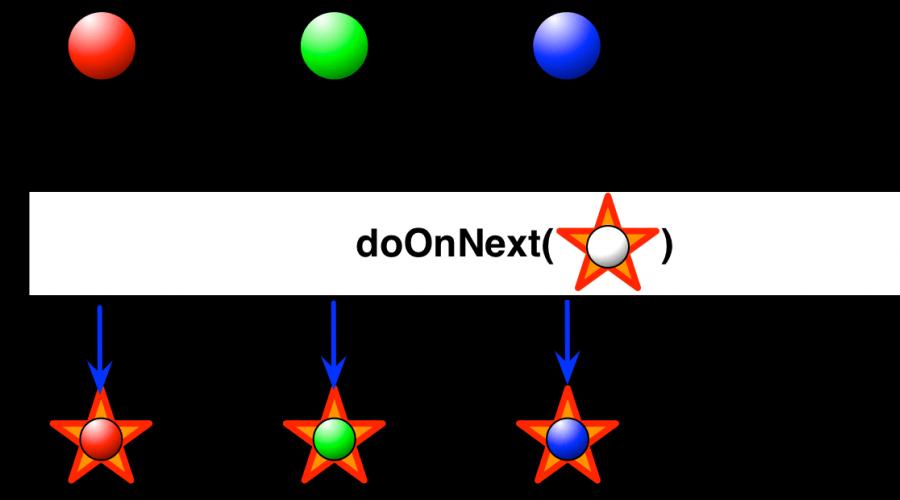
The doOnNext operator is much like doOnEach(Action1) except that the Action that you pass it as a parameter does not accept a Notification but instead simply accepts the emitted item.
Sample CodeObservable.just(1, 2, 3) .doOnNext(new Action1() { @Override public void call(Integer item) { if(item > 1) { throw new RuntimeException("Item exceeds maximum value"); } } }).subscribe(new Subscriber() { @Override public void onNext(Integer item) { System.out.println("Next: " + item); } @Override public void onError(Throwable error) { System.err.println("Error: " + error.getMessage()); } @Override public void onCompleted() { System.out.println("Sequence complete."); } });
Next: 1 Error: Item exceeds maximum value
- Javadoc:
The doOnRequest operator (new in RxJava 1.1) registers an Action which will be called whenever an observer requests additional items from the resulting Observable. That Action receives as its parameter the number of items that the observer is requesting.
- Javadoc:
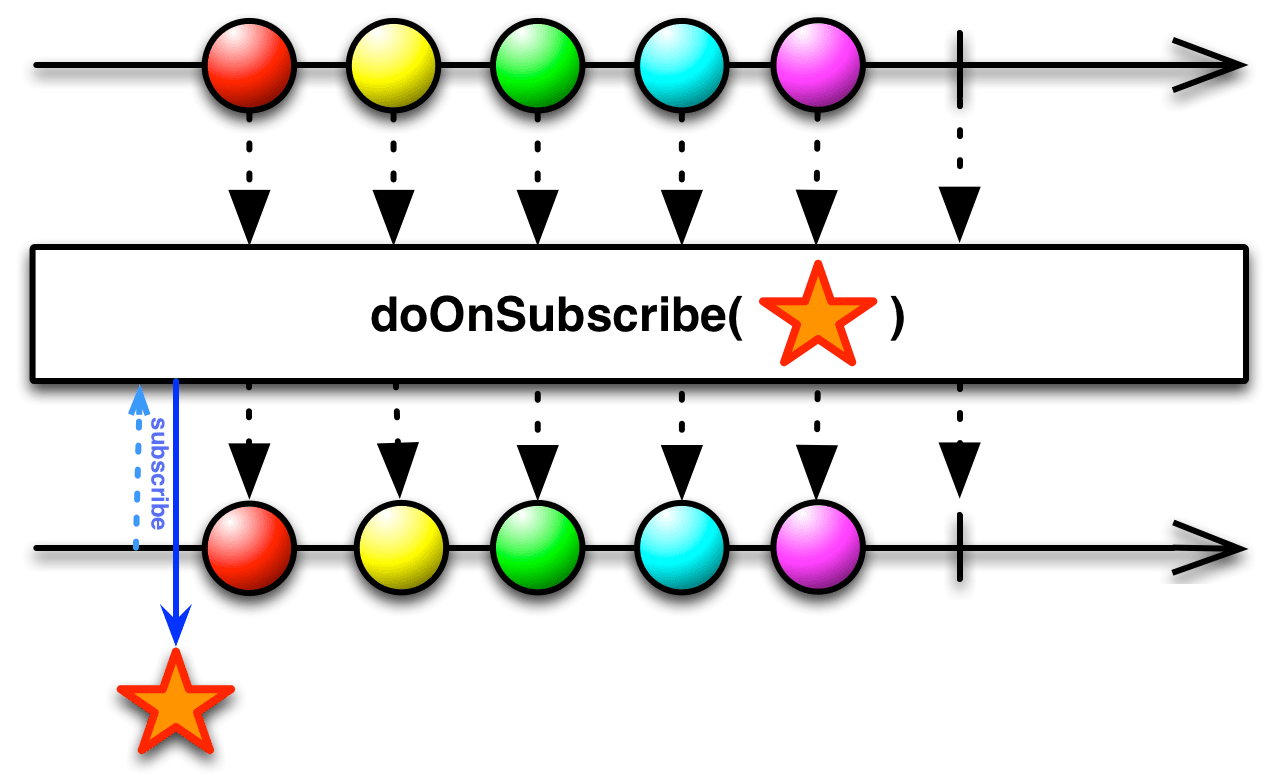
The doOnSubscribe operator registers an Action which will be called whenever an observer subscribes to the resulting Observable.
- Javadoc:
The doOnUnsubscribe operator registers an Action which will be called whenever an observer unsubscribes from the resulting Observable.
- Javadoc:
The doOnCompleted operator registers an Action which will be called if the resulting Observable terminates normally, calling onCompleted .
- Javadoc:
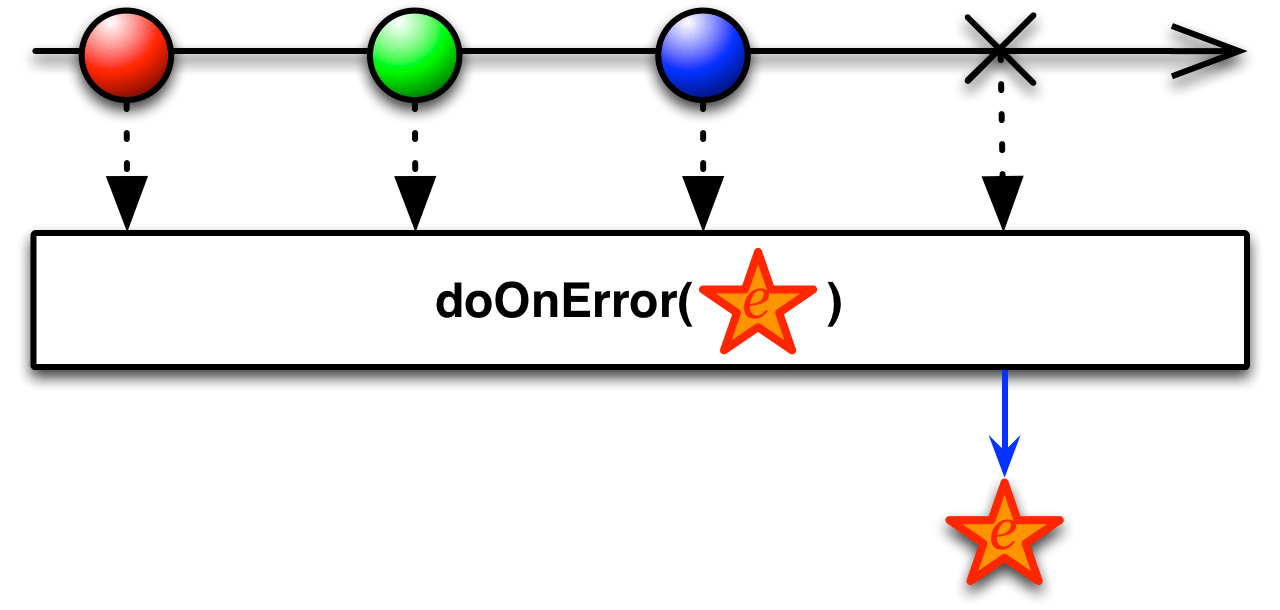
The doOnError operator registers an Action which will be called if the resulting Observable terminates abnormally, calling onError . This Action will be passed the Throwable representing the error.
- Javadoc:
The doOnTerminate operator registers an Action which will be called just before the resulting Observable terminates, whether normally or with an error.
- Javadoc:
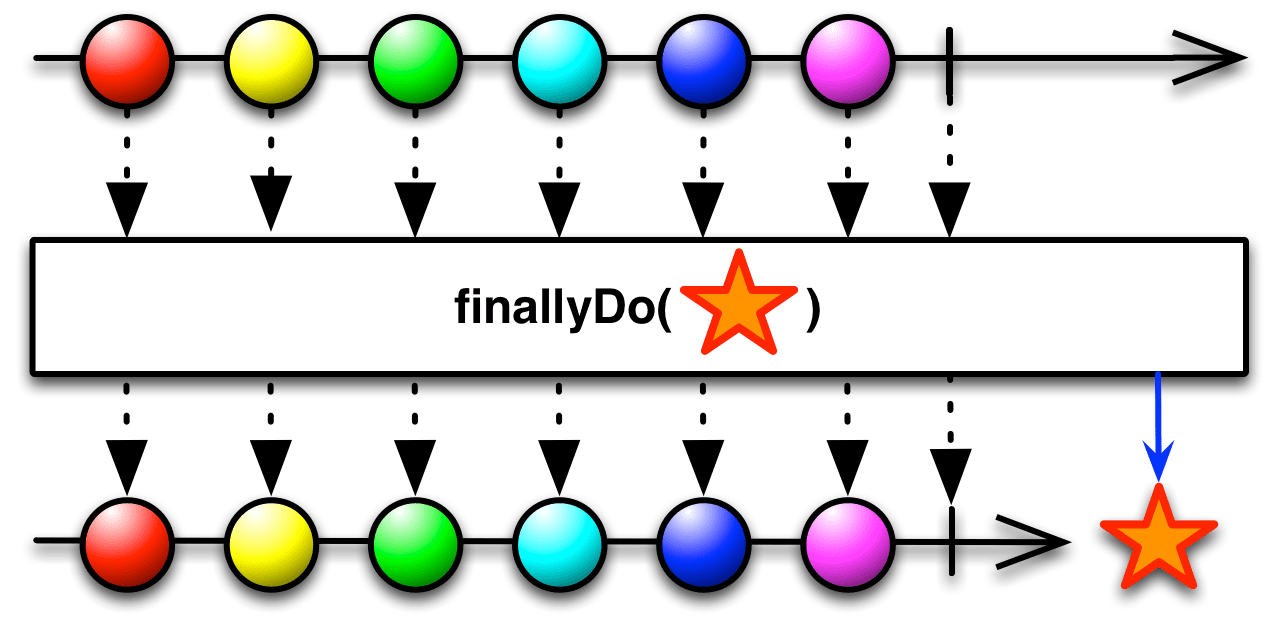
finallyDo is deprecated since RxJava 1.1.1, in favor of doAfterTerminate with the same behavior.
The finallyDo operator registers an Action which will be called just after the resulting Observable terminates, whether normally or with an error.
- Javadoc:

The doAfterTerminate operator registers an Action which will be called just after the resulting Observable terminates, whether normally or with an error.
- Javadoc:

RxJS implements the basic Do operator as do or tap (two names for the same operator). You have two choices for how to use this operator:
/* Using an observer */ var observer = Rx.Observer.create(function (x) { console.log("Do Next: %s", x); }, function (err) { console.log("Do Error: %s", err); }, function () { console.log("Do Completed"); }); var source = Rx.Observable.range(0, 3) .do(observer); var subscription = source.subscribe(function (x) { console.log("Next: %s", x); }, function (err) { console.log("Error: %s", err); }, function () { console.log("Completed"); });
/* Using a function */ var source = Rx.Observable.range(0, 3) .do(function (x) { console.log("Do Next:", x); }, function (err) { console.log("Do Error:", err); }, function () { console.log("Do Completed"); }); var subscription = source.subscribe(function (x) { console.log("Next: %s", x); }, function (err) { console.log("Error: %s", err); }, function () { console.log("Completed"); });
Do Next: 0 Next: 0 Do Next: 1 Next: 1 Do Next: 2 Next: 2 Do Completed Completed
RxJS also implements doOnNext or tapOnNext (two names for the same operator). It is a specialized form of Do that responds only to the onNext case, by calling a callback function you provide as a parameter. You may also optionally pass a second parameter that will be the “ this ” object from the point of view of your callback function when it executes.
Sample Codevar source = Rx.Observable.range(0, 3) .doOnNext(function () { this.log("Do Next: %s", x); }, console); var subscription = source.subscribe(function (x) { console.log("Next: %s", x); }, function (err) { console.log("Error: %s", err); }, function () { console.log("Completed"); });
Do Next: 0 Next: 0 Do Next: 1 Next: 1 Do Next: 2 Next: 2 Completed
RxJS also implements doOnError or tapOnError (two names for the same operator). It is a specialized form of Do that responds only to the onError case, by calling a callback function you provide as a parameter. You may also optionally pass a second parameter that will be the “ this ” object from the point of view of your callback function when it executes.
Sample Codevar source = Rx.Observable.throw(new Error()); .doOnError(function (err) { this.log("Do Error: %s", err); }, console); var subscription = source.subscribe(function (x) { console.log("Next: %s", x); }, function (err) { console.log("Error: %s", err); }, function () { console.log("Completed"); });
Do Error: Error Error: Error
RxJS also implements doOnCompleted or tapOnCompleted (two names for the same operator). It is a specialized form of Do that responds only to the onCompleted case, by calling a callback function you provide as a parameter. You may also optionally pass a second parameter that will be the “ this ” object from the point of view of your callback function when it executes.
Sample Codevar source = Rx.Observable.range(0, 3) .doOnCompleted(function () { this.log("Do Completed"); }, console); var subscription = source.subscribe(function (x) { console.log("Next: %s", x); }, function (err) { console.log("Error: %s", err); }, function () { console.log("Completed"); });
Next: 0 Next: 1 Next: 2 Do Completed Completed

RxJS also implements a finally operator. It takes a function that will be called after the resulting Observable terminates, whether normally (onCompleted) or abnormally (onError).
Sample Codevar source = Rx.Observable.throw(new Error()) .finally(function () { console.log("Finally"); }); var subscription = source.subscribe(function (x) { console.log("Next: " + x); }, function (err) { console.log("Error: " + err); }, function () { console.log("Completed"); });
Error: Error Finally
do / tap , doOnNext / tapOnNext , doOnError / tapOnError , doOnCompleted / tapOnCompleted , and finally are found in each of the following distributions:
- rx.js
- rx.all.js
- rx.all.compat.js
- rx.compat.js
- rx.lite.js
- rx.lite.compat.js
RxPHP implements this operator as do .
Invokes an action for each element in the observable sequence and invokes an action upon graceful or exceptional termination of the observable sequence. This method can be used for debugging, logging, etc. of query behavior by intercepting the message stream to run arbitrary actions for messages on the pipeline. When using do, it is important to note that the Observer may receive additional events after a stream has completed or errored (such as when using a repeat or resubscribing). If you are using an Observable that extends the AbstractObservable, you will not receive these events. For this special case, use the DoObserver. doOnNext, doOnError, and doOnCompleted uses the DoObserver internally and will receive these additional events.
Sample Code//from https://github.com/ReactiveX/RxPHP/blob/master/demo/do/do.php $source = \Rx\Observable::range(0, 3) ->do(function ($x) { echo "Do Next:", $x, PHP_EOL; }, function (Throwable $err) { echo "Do Error:", $err->getMessage(), PHP_EOL; }, function () { echo "Do Completed", PHP_EOL; }); $subscription = $source->subscribe($stdoutObserver);
Do Next:0 Next value: 0 Do Next:1 Next value: 1 Do Next:2 Next value: 2 Do Completed Complete!
RxPHP also has an operator doOnError .
Sample Code//from https://github.com/ReactiveX/RxPHP/blob/master/demo/do/doOnError.php $source = \Rx\Observable::error(new Exception("Oops")) ->doOnError(function (Throwable $err) { echo "Do Error:", $err->getMessage(), PHP_EOL; }); $subscription = $source->subscribe($stdoutObserver);
Do Error:Oops Exception: Oops
RxPHP also has an operator doOnCompleted .
Sample Code//from https://github.com/ReactiveX/RxPHP/blob/master/demo/do/doOnCompleted.php $source = \Rx\Observable::empty() ->doOnCompleted(function () { echo "Do Completed", PHP_EOL; }); $subscription = $source->subscribe($stdoutObserver);
Do Completed Complete!
RxPHP also has an operator finally .
Will call a specified function when the source terminates on complete or error.
Sample Code//from https://github.com/ReactiveX/RxPHP/blob/master/demo/finally/finally.php Rx\Observable::range(1, 3) ->finally(function() { echo "Finally\n"; }) ->subscribe($stdoutObserver);
Next value: 1 Next value: 2 Next value: 3 Complete! Finally
//from https://github.com/ReactiveX/RxPHP/blob/master/demo/finally/finally-error.php Rx\Observable::range(1, 3) ->map(function($value) { if ($value == 2) { throw new \Exception("error"); } return $value; }) ->finally(function() { echo "Finally\n"; }) ->subscribe($stdoutObserver);
Next value: 1 Exception: error Finally